
This post is about some special discussion tile choices and how tile fit into our layout. Many people pick their tiles based on design or decorating skill. But when you are re-tiling your shower, chances are it is easier to redo just about any other part of the bathroom to match your tiles. Therefore, one can pick pretty AND practical tiles. I got lucky.
First, there is measurement to consider. For some, the area of the shower and the size of the tile are totally independent; after all tile can be cut. However, if one can nudge their shower to be a couple inches bigger or smaller to avoid cutting tiles, why not plan accordingly?
First lesson: The back of your shower is predetermined. The sides are flexible and cane be chosen based on the width of your chosen tile – but once the backerboard is up, the size is determined. When planning for the sides, we should not have forgotten about our corner grout line. The tiles ended up kind of weirdly overlapping and our carefully-measured shower sides were just ~1/2″ too short since that corner grout line took up more space than I expected (and I sawed 1/2″ off of the 2×17 tiles that spanned the height of the shower). For our 3/16″ tile, the corner line is ~3/16″ + thicknesses of the field tile because of how they line up. Thank goodness for the power tile saw and caulk – but save yourself the grief.

Crowded corner. The tiles on the right actually overlap those on the left.
Since the tiles on the left are too far over, it was also annoying because I ended up with a super skinny tile on the righthand side (which were also a pain to cut):

Thin tile set with thinset.
So, since the actual tile being used should influence some backerboard specifics for the measuring-inclined, here are some of my thoughts about which tile to use. I relayed a lot about picking tiles here. Then note that I had bought these particular tiles before I knew what Fireclay tile was. For the shower, we picked a 4.25″ ceramic field tile called “Pepper White” by Dal (which you cannot see the speckles on in any pictures) because:
- We liked it.
- It had matching quarter rounds. Many tiles, especially those made out of weird materials don’t have matching quarter rounds. We needed quarter rounds for the window and all around the edges due to how our backerboard was not flush with the wall. I didn’t want to have any alignment errors stand out because of a sudden color change. Unusual tile materials and mosaics are less likely to have matching quarter rounds. Also, the quarter rounds for this project cost basically as much as the field tile (~$150 for the quarter rounds)! So, if you know you need ~90 quarter rounds, keep it mind that they charge by the piece for these special shapes.
- It was >35% recycled. But I can do better next time this way.
- It was made in the USA. Those freaking quarter rounds were not though.
- It wasn’t a solid white – I figured the freckles would distract from any of my alignment errors. Judge for yourself
- It was cheap. (And it’s clear why. The Fireclay tile in our kitchen make these Dal tiles feel badly about themselves.)
- It fit well with the house – it’s not a modern tile in a not-so-modern house. I like these stripy contemporary, wood-look-alike tiles, but it would look weird here with all of our real wood.
- It fit well with my wooden bathroom counter top – we are going for a sort of rustic look here. At least that’s how I’m going to explain these grout lines!
- The tiles are still whitish so they should match nearly everything for a long time – what is the 2014 equivalent of pink tile anyway?
Here are the unexpected benefits.
- The 4.25″ tile plus our 3/16″ grout lines spanned the height of the shower perfectly, even when I had to consider the measurements of the silly window. This was luck. The height of our shower was chosen to be exactly 1 field tile + 2 grout lines + 2 quarter rounds.
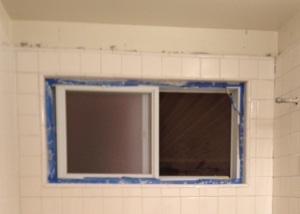
Tile around the window
I don’t really want to spoil this, but it makes more sense with the picture. I didn’t want an awkward half-height tile above the window, hence the choice of the total height.
- Stray thinset that dries on these glazed ceramic tiles scrapes off quite easily with a putty knife. Remember that bit about learning from my mistakes? This is not true for all pricier materials. And with the quarter rounds, some of the thinset was not wipable while wet since I had to tape the quarter rounds into place.
- The tiles don’t scratch with sanded grout.
- The tiles cut easily with our power tile saw…which it was $80 to buy or $26/day from home depot to rent. This project spanned at least 4 weeks so buying the saw was the right call!
- The tiles were sturdy enough were you can pry them off if, after the thinset dried, you determined rearrangement was necessary…

The next step of the process was mixing thinset and actual sticking these carefully-chosen tiles to our carefully-measured backerboard!
Did you miss out on part one on how to put up backerboard?
